How to Clean a Coffee Maker Easily for Fresh Coffee
Every morning, millions of people rely on a fresh cup of coffee to start their day. But few realize that the coffee maker—the hero behind that warm brew—needs regular cleaning to keep working well. If you’ve ever noticed your coffee tasting bitter, smelling strange, or your machine running slower than before, it’s likely because it’s overdue for a good clean. A dirty coffee maker doesn’t just affect taste; it can also harbor bacteria, mold, and mineral buildup that shorten the lifespan of your machine. Learning how to clean a coffee maker properly is simple, but doing it right makes all the difference in flavor, safety, and machine performance.
In this guide, you’ll find step-by-step instructions, practical tips, and expert advice to clean most home coffee makers. Whether you use a classic drip machine, a single-serve pod system, or a French press, you’ll discover what really works—and what doesn’t.
We’ll also clear up common myths, highlight mistakes beginners make, and show you how to maintain your coffee maker like a pro.
Why Cleaning Your Coffee Maker Matters
Most people clean the coffee pot and maybe the filter, but forget about the inside of the machine. Over time, water minerals, coffee oils, and even mold can build up in places you can’t see. According to a study by NSF International, about 50% of home coffee makers tested had yeast or mold growing inside. That’s more than found on bathroom faucet handles! These contaminants can affect your health, especially if you have allergies or a weak immune system.
A clean coffee maker also ensures the best taste. Old coffee oils and limescale can make coffee bitter or stale. A study by the National Coffee Association found that regular cleaning improves coffee flavor and aroma. For machine longevity, cleaning removes buildup that can clog pipes and pumps, reducing breakdowns and expensive repairs.
How Often Should You Clean A Coffee Maker?
How often you clean depends on how much you use your coffee maker and the type of water in your area. Here’s a basic schedule:
- After Every Use: Wash the carafe and filter basket with warm, soapy water.
- Weekly: Wipe down the exterior and clean removable parts.
- Monthly: Deep clean the machine’s interior (descale) to remove mineral deposits.
If you use hard water (water with lots of minerals), you may need to descale more often. If you notice your coffee tasting off or your machine making odd noises, don’t wait—clean it sooner.
What You Need To Clean A Coffee Maker
You don’t need expensive products. Most items are already in your kitchen:
- White vinegar (for descaling and disinfecting)
- Baking soda (optional, for odor removal)
- Dish soap
- Clean water
- Soft sponge or brush
- Dry cloth or paper towels
For pod or capsule machines, you may also need a small brush or toothpick to clean tiny parts.
Step-by-step Guide: Cleaning A Drip Coffee Maker
Most homes use a drip coffee maker. Here’s how to clean it inside and out.
1. Daily Cleaning (after Each Use)
- Turn off and unplug the machine.
- Remove the carafe and wash it with warm, soapy water.
- Remove the filter basket. Wash it well to get rid of oils and grounds.
- Wipe the exterior with a damp cloth to remove splashes and dust.
- Leave the lid open so the inside dries completely (helps prevent mold).
2. Deep Cleaning (monthly Descaling)
Over time, minerals from water build up inside the machine. Here’s how to descale:
- Fill the water reservoir with a mixture of equal parts white vinegar and water.
- Place a clean, empty carafe in the machine.
- Start a brew cycle. Let the machine run until half the mixture has flowed through.
- Turn off the coffee maker and let it sit for 30–60 minutes. This loosens hard deposits.
- Turn the machine back on and finish the cycle.
- Empty the carafe and rinse it.
- Fill the reservoir with fresh water and run 2–3 cycles to rinse out the vinegar smell.
3. Cleaning The Carafe
For tough stains, fill the carafe with warm water and add 1 tablespoon of baking soda. Let it soak for 15–30 minutes, then scrub and rinse. For glass carafes, avoid using anything abrasive that could scratch the surface.
4. Cleaning Removable Parts
Wash the filter basket and any other removable parts with hot, soapy water. Rinse and dry thoroughly. If you use a reusable mesh filter, check for trapped grounds.
5. Wiping The Machine
Don’t forget the outside! Wipe the warming plate with a damp cloth (when cool) to remove coffee drips. Clean buttons and display screens gently to keep them working well.
6. Drying
After cleaning, leave the lid and water reservoir open until completely dry. This prevents musty smells and mold.
:strip_icc()/How_to_clean_coffeemaker_0220-Primary-d0c8d75c767a4d04a5b92b77d6db808c.jpg)
Credit: www.bhg.com
Cleaning Other Types Of Coffee Makers
Not all machines are the same. Here’s how to clean other popular types.
Single-serve Pod Machines (keurig, Nespresso, Etc.)
- Daily: Remove the used pod, empty the drip tray, and wipe the exterior.
- Weekly: Wash the water reservoir, pod holder, and drip tray with warm, soapy water.
- Monthly Descaling: Fill the reservoir with a descaling solution or vinegar-water mix (check the manual). Run the brew cycle without a pod, then rinse with clean water.
Extra tip: Use a small brush or toothpick to remove coffee grounds from the needle or piercing tool.
French Press
- Disassemble the plunger and filter.
- Discard used grounds (they can clog drains—compost them if possible).
- Wash all parts with warm, soapy water and a soft brush.
- For stubborn oils, soak parts in a mix of baking soda and water.
- Rinse well and dry completely before reassembling.
Espresso Machines
Espresso machines require more care, especially if they have steam wands.
- Wipe the steam wand after every use.
- Run a water cycle through the group head to remove coffee oils.
- Descale the machine every 1–2 months or as recommended by the manufacturer.
- Use espresso machine cleaning tablets if your model supports them.
Percolators And Moka Pots
- Disassemble all parts.
- Clean with warm, soapy water and a brush.
- For aluminum models, avoid acidic cleaners like vinegar (they can damage the metal).
- Dry thoroughly before storing.
Common Mistakes When Cleaning A Coffee Maker
Even with good intentions, it’s easy to make mistakes. Here’s what to avoid:
- Using Only Water: Water alone doesn’t remove oils, mold, or minerals.
- Skipping Descaling: Mineral buildup is invisible at first but clogs the machine over time.
- Neglecting Small Parts: The lid, spout, and filter basket can hide bacteria.
- Not Rinsing Enough: If you don’t rinse after using vinegar, your coffee will taste sour.
- Using Strong Chemicals: Bleach or harsh cleaners can damage parts and leave harmful residues.
- Forgetting to Dry: Storing parts wet encourages mold and bacteria growth.
Comparing Cleaning Methods
What’s the best way to clean a coffee maker? Different methods have pros and cons.
| Cleaning Method | Pros | Cons |
|---|---|---|
| White Vinegar | Cheap, effective against minerals and mold | Strong smell, needs thorough rinsing |
| Commercial Descaler | Designed for machines, less odor | More expensive, may not be in every store |
| Baking Soda | Great for removing stains and odors | Not as effective for hard water buildup |
| Lemon Juice | Natural, pleasant scent | Can leave residue, less effective than vinegar |
For most people, white vinegar is the best balance of effectiveness and cost. Commercial descalers are a good option for expensive or specialty machines.
Signs Your Coffee Maker Needs Cleaning
Sometimes, your coffee maker tells you it needs attention. Here are signs to watch for:
- Unusual taste: Coffee is bitter or sour, even with fresh beans.
- Slow brewing: The machine takes longer than normal.
- Visible residue: White, chalky buildup inside the reservoir or carafe.
- Bad smells: Musty or sour odors from the machine.
- Noisy operation: Gurgling or loud noises during brewing.
If you notice any of these, clean your coffee maker before your next cup.
:max_bytes(150000):strip_icc()/6-coffee-maker-components-washed-separately-045ca3f7a9b14ec29aa07f32b3c9555f.jpg)
Credit: www.foodandwine.com
How Water Quality Affects Cleaning
The type of water you use makes a big difference. Hard water (rich in minerals) causes more limescale. If you live in a hard water area, your machine will need more frequent descaling.
Here’s a quick comparison:
| Water Type | Descaling Frequency | Common Issues |
|---|---|---|
| Soft Water | Every 2–3 months | Less mineral buildup |
| Moderately Hard Water | Monthly | Moderate limescale buildup |
| Very Hard Water | Every 2–3 weeks | Heavy mineral deposits, taste issues |
Tip: If you’re not sure about your water, check with your local water supplier or look for white spots in your kettle or coffee maker.
Special Tips For Better Cleaning Results
- Clean right after brewing: Coffee oils and stains are easier to remove before they dry.
- Use filtered water: This reduces mineral buildup and improves coffee taste.
- Clean all parts: Don’t forget lids, spouts, and reusable filters.
- Avoid putting electrical parts in water: Only clean the outside with a damp cloth.
- Dry thoroughly: Leaving parts damp is one of the main causes of mold.
Non-obvious insight: Even if your carafe looks clean, invisible coffee oils stick to the glass or stainless steel. These oils can turn rancid, affecting taste. Occasional deep cleaning with baking soda removes these oils.
Another tip: Don’t ignore the water reservoir. It’s often the dirtiest part because it stays damp and dark, the perfect place for bacteria and mold.
How To Clean A Coffee Maker Without Vinegar
Some people dislike the smell of vinegar or are sensitive to it. Here are good alternatives:
- Lemon Juice: Mix equal parts lemon juice and water. It works similarly to vinegar, with a fresher scent.
- Baking Soda Solution: Dissolve 1/4 cup baking soda in a liter of warm water. Run this through the machine, then rinse with water.
- Commercial Descalers: Brands like Dezcal and Urnex make products specifically for coffee makers. Follow the instructions on the package.
No matter what you use, always rinse the machine with fresh water 2–3 times after cleaning.
How To Maintain Your Coffee Maker For Longevity
Cleaning is not just about removing dirt; it’s about protecting your investment. Here’s how to keep your machine working well for years:
- Use filtered or bottled water if your tap water is very hard.
- Change water daily so old water doesn’t sit in the reservoir.
- Replace paper filters after each use to prevent bacteria growth.
- Run a water-only cycle every few days to clear out leftover coffee oils.
- Store with the lid open to let air circulate and dry the inside.

Credit: www.youtube.com
Comparing Cleaning Frequency By Coffee Maker Type
Some machines need more attention than others.
| Coffee Maker Type | Daily Cleaning | Deep Cleaning |
|---|---|---|
| Drip Machine | Carafe, filter basket, exterior | Monthly descaling |
| Single-Serve Pod | Pod holder, drip tray, exterior | Monthly descaling |
| French Press | All parts after use | Occasional deep soak |
| Espresso Machine | Portafilter, steam wand, exterior | 1–2 months, or as needed |
| Moka Pot | All parts after use | Deep clean as needed |
What To Do If Your Coffee Maker Still Smells Or Tastes Bad
If you’ve cleaned your coffee maker and the problem remains:
- Double-check for hidden parts (like rubber gaskets or valves) that need cleaning.
- Run another rinse cycle with clean water.
- Try a different cleaning method (baking soda or lemon juice).
- Check your water source for off-odors.
- For plastic taste, fill the reservoir with a baking soda solution and let it sit overnight.
If nothing works, it may be time to replace old or worn parts.
When To Replace Your Coffee Maker
Even with the best care, coffee makers don’t last forever. Most drip machines last 3–5 years with regular cleaning. Signs it’s time for a new one:
- Coffee never tastes right, no matter what you do.
- Machine leaks or won’t heat properly.
- Buttons or displays stop working.
- Heavy mineral buildup that won’t come off.
Buying a new machine can save you time, energy, and money in the long run.
Frequently Asked Questions
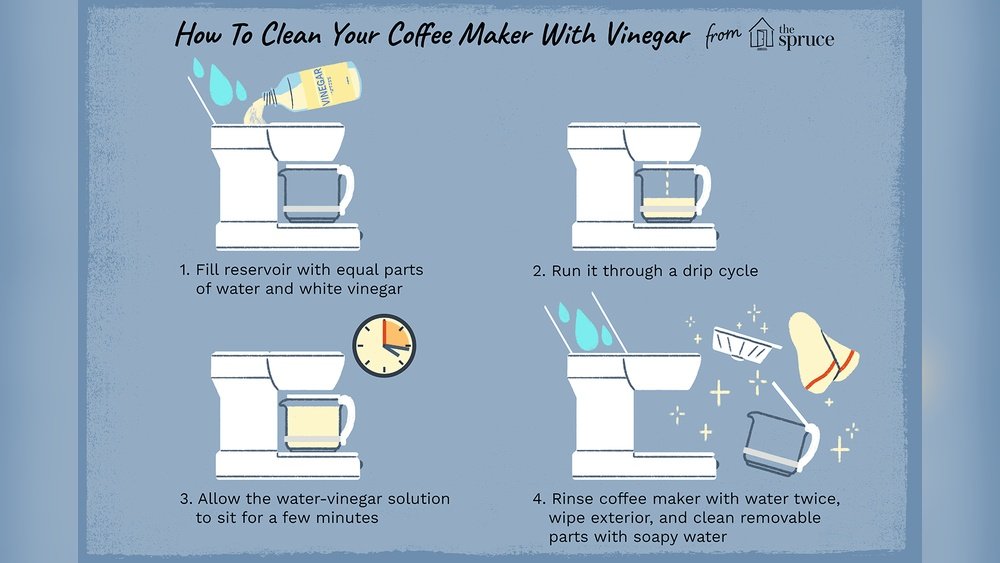
How Do I Clean A Coffee Maker With Vinegar?
Fill the reservoir with a mix of equal parts white vinegar and water. Run a brew cycle, let it sit for 30–60 minutes, then finish the cycle. Rinse with 2–3 cycles of clean water to remove any vinegar taste.
Can I Use Dish Soap To Clean My Coffee Maker?
You can use dish soap for the carafe, filter basket, and removable parts. Never run soap through the inside of the machine; it can leave residue and affect taste. Always rinse well.
Is It Safe To Use Bleach To Clean A Coffee Maker?
No, bleach is too harsh and can damage parts or leave harmful chemicals behind. Stick with vinegar, baking soda, or commercial descalers for a safe clean.
How Can I Prevent Mold In My Coffee Maker?
Always empty and dry the carafe and reservoir after each use. Store with the lid open to let air circulate. Clean all removable parts often, and descale monthly.
Where Can I Learn More About Coffee Maker Care?
You can find detailed care tips at the National Coffee Association website, a trusted authority on coffee.
A clean coffee maker is the secret to delicious, fresh-tasting coffee every day. Regular care doesn’t just protect your investment—it protects your health and makes your morning routine better. Take these steps, and you’ll enjoy every cup to the last drop.